How To Plan A Practical Garden Tool Storage Setup
A practical step-by-step guide to how to plan a practical garden-tool storage setup, including preparation, instructions, common issues, tips, and next steps.
How To Plan A Practical Garden Tool Storage Setup
A practical garden-tool storage setup saves time, prevents rust and damage, and keeps your outdoor space safe. This guide will help you assess your tools, choose a storage spot, organize by frequency of use, and build simple racks or shelves. You'll learn how to clean tools before storing, protect handles, and create a seasonal rotation. By the end, you'll have an efficient system that works for any garage, shed, or small space.
Fast Answer
- Group tools by how often you use them, then place the most-used ones at waist height for easy reach.
- Store everything off the floor on pegboards, hooks, or shelves to prevent rust and tripping hazards.
Before You Start
- Gather all your garden tools in one place to see what you have and check for damage.
- Decide on a storage area like a shed, garage corner, or weatherproof cabinet.
- Collect organizing materials such as wall hooks, pegboard, bungee cords, and sturdy shelves.
- Clean and dry every tool before you store it to keep rust and soil buildup away.
Step-by-Step Instructions
Assess Your Tool Collection and Needs
Start by gathering every garden tool you own from the shed, garage, basement, or wherever they currently rest. Lay them out on a tarp or clean surface and sort them into three piles: hand tools (pruners, trowels, weeders), long-handled tools (shovels, rakes, hoes), and power tools or large equipment (trimmers, edgers, cultivators). As you sort, inspect each tool for rust, loose handles, or bent tines. Make a note of any tools that need repair or sharpening before they go into storage. Also, decide which tools you genuinely use each season and which are rarely touched or broken. This evaluation helps you know what you actually need to store and where. For example, if you garden mostly in spring and fall, your summer tools like the hedge trimmer might be stored higher up. If you use the trowel daily, it should have a spot near the door or at eye level. This step's practical check is to physically count each type of tool and compare that to what you have space for. If you have more than you can store conveniently, consider donating duplicates or broken tools. Understanding your collection size and habits prevents you from building a storage plan that is too small or misaligned with how you actually work. It also makes later steps easier because you will know exactly what you need to hold.
Choose the Right Location and Layout
Decide where your tool storage will live. A dry, shaded area is best because direct sun and moisture contribute to rust and wood cracking. Common spots include a shed, a garage corner, a dedicated cabinet, or a covered patio wall. Before you build anything, measure the space you have. Note the wall height, floor area, and any obstructions like windows or pipes. Sketch a simple floor plan on paper, marking where you will place a freestanding rack, a wall-mounted pegboard, a shelf unit, or a tool rack. Consider airflow: tools need air circulation to avoid condensation, so avoid sealing them in an airtight bin unless you add silica gel packs. Also, plan a floor zone for large items like wheelbarrows or snow shovels, and an upper zone for lighter, rarely used tools. The practical check here is to physically measure and then walk through the space with your tool piles, ensuring you have enough room to open a door or move a wheelbarrow. You should also think about how easy it is to reach the area in rain or snow. If your space is cramped, you might choose a floor-standing rack with a small footprint. This layout step is essential because a well-chosen location reduces the time you spend retrieving tools and prevents damage from environmental factors. A good layout also keeps walkways clear to avoid accidents. Once you have a plan, you can move on to installing a system that fits that space exactly.
Install Wall-Mounted Storage Systems
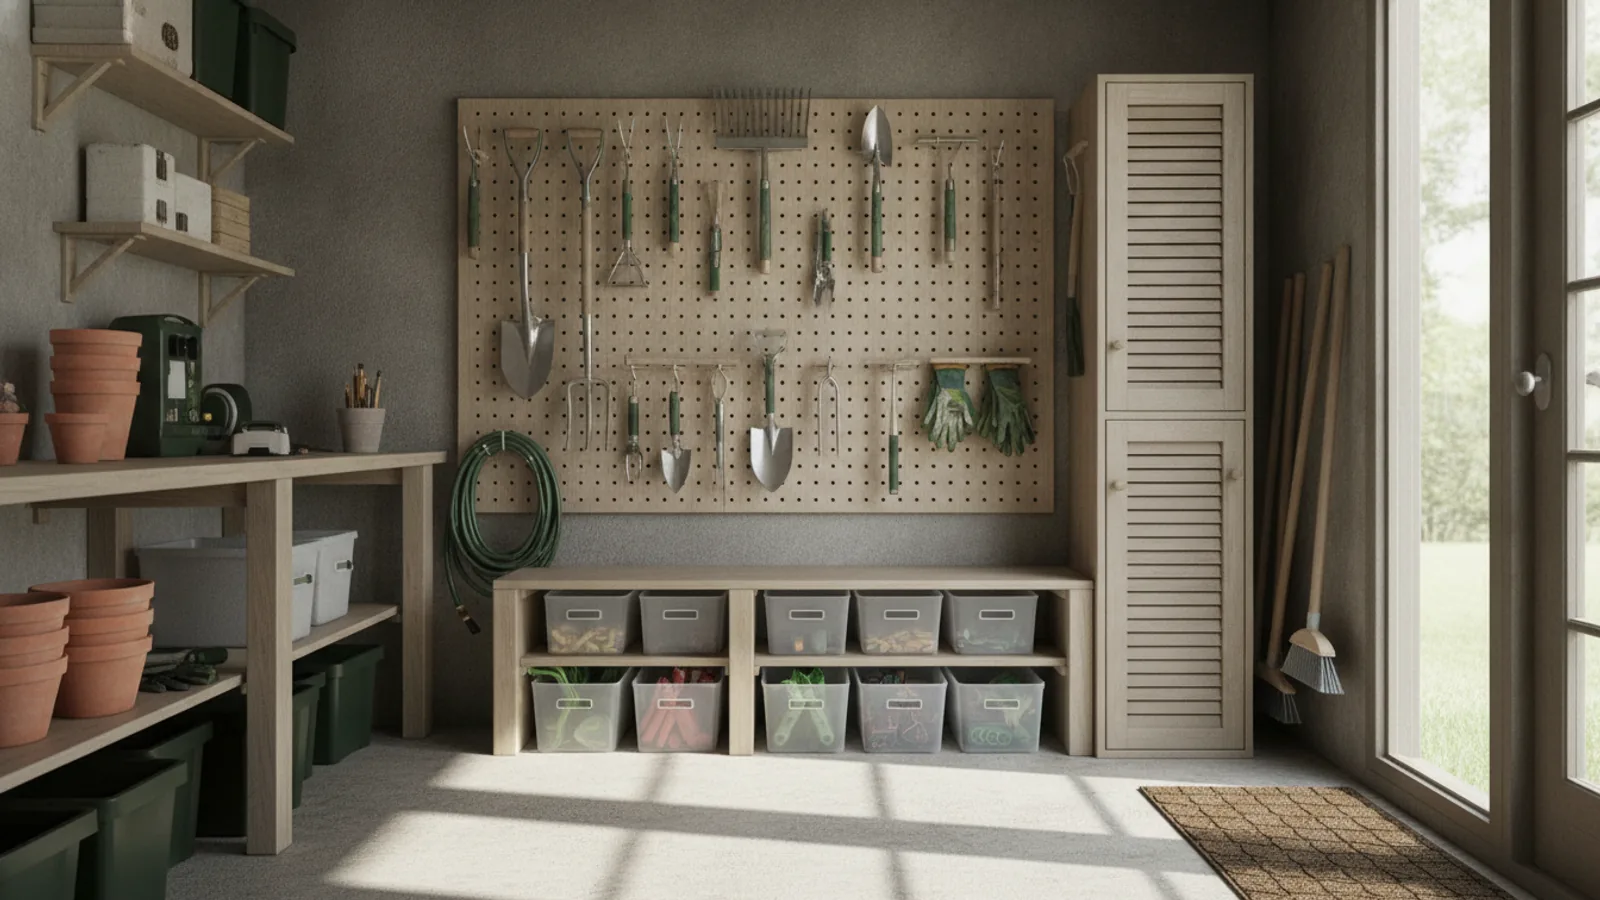
Wall-mounted storage is the most efficient way to hold many tools while keeping them off the floor. Choose a sturdy wall material like studs in a garage or shed. For lighter tools, you can use a pegboard. For heavier items, use heavy-duty hooks or a wall rack. Start by finding the wall studs with a stud finder. Mark their locations with a pencil. If you're using a pegboard, cut it to fit your space, leaving at least 2 inches from the floor. Screw the pegboard onto the wall with screws that reach the studs. For hooks, screw them directly into the studs. Then, arrange hooks at different heights to accommodate long-handled tools. You can also attach a wooden rail with holes to hold individual tools like shovels. This step's practical check is to wiggle each hook or board after installation to ensure it is solid. Also, hang a few tools and verify they do not tip or fall. This setup is important because it gets tools off the ground where they can be stepped on or rust, and it makes them visible so you do not buy duplicates. A well-installed wall system can handle a surprising amount of weight when anchored to studs. It also clears floor space for freestanding items and makes cleaning easier. Remember to place the most-used tools within easy reach, about shoulder to waist height. Installing everything correctly now prevents damage to your walls and tools later.
Build or Buy Freestanding Racks and Shelves
Freestanding racks are useful for tools that do not hang well, like shovels with wide blades, and for storing supplies like pots, soil bags, and gloves. You can purchase a metal or wood rack, or build one using lumber. A simple design is a tall shelf unit with plywood shelves and a rod on the side for hanging tools. If you build, cut wooden posts to the desired height, typically 6 feet, and attach shelves at intervals of about 18 inches. For a tool rack that holds long handles, drill holes in an overhead shelf and slide the handles through, or use a special rack with fitted slots. Place the rack in the corner of your storage area, away from moisture. This step's practical check is to load the rack with your heaviest tools, like a sledgehammer or a full watering can, and ensure it does not wobble. Also, check that every item fits without overhanging and that you can easily lift things down. A sturdy freestanding rack is essential because it provides flexible storage for odd-shaped items that cannot be wall-mounted. It also allows you to store things in categories, making it faster to find what you need. If you build, use pressure-treated wood or paint it to resist moisture. Ensure the base is stable by adding cross braces. With a well-organized rack, you can see all your supplies at a glance and avoid the frustration of digging through a pile.
Organize Tools by Frequency and Type
Now that you have hanging space and shelves, arrange your tools logically. Group by how often you use them. For example, your everyday trowel, pruners, and gloves should be within easy reach on a pegboard near the door or at waist height. Tools used weekly, like a spade or rake, can be on a secondary hook or shelf. Seasonal tools, like a tiller or hedge trimmer, can be stored on the highest shelves or in a back corner. Also, group by function: cutting tools (shears, pruners) in one area, digging tools (shovels, trowels) in another, and soil or lawn tools (rakes, aerators) together. Label the spots with a marker or small tags. This step's practical check is to time yourself retrieving a few common tools. If it takes more than a minute, rearrange. For example, place the rake near the door if you use it every weekend. This system saves time and reduces frustration because you always know where each tool is. It also reduces the chance of buying duplicates because you can see what you have. Organizing by type also aids maintenance: you can quickly see which tools need sharpening or oiling. Make adjustments based on your garden layout as well. If your garden beds are at the back, keep your long-handled tools closer to the entrance. The key is to adapt the system to your habits, not the other way around. Once everything is in its place, you will find it much easier to keep your storage area tidy.
Maintain and Adjust Your System Regularly
A storage setup is not a one-time project. Every few weeks, spend 10 minutes checking your tools and the storage area. Wipe off any moisture, soil, or debris. If you see rust on metal parts, remove it with a wire brush and apply a light oil. Tighten any screws or hooks that have worked loose. At the end of each gardening season, do a deeper maintenance pass: clean tools thoroughly, sharpen blades, oil wooden handles, and replace any broken parts. This step's practical check is to physically test each hook or shelf by giving it a tap and verifying that it is still stable. Also, observe if you are leaving tools out because they do not have a designated spot. If so, create a new hook or shelf for them. Over time, your garden needs may change, so the same system must evolve. For example, if you start a vegetable garden, you may need more hand trowels and that space should be increased. If you get rid of a tool, remove its hook to keep the area uncluttered. Regular maintenance prevents small issues from becoming bigger problems, like rust ruining a tool or a loose shelf collapsing. It also keeps your shed or garage looking neat and inviting. After each maintenance session, re-evaluate if your setup is still practical. This habit ensures you always have a functional and efficient storage system that serves you for years.
Quick Reference
| Situation | Action | Why it helps |
|---|---|---|
| You come inside from gardening and it starts to rain. | Immediately wipe down each tool with a dry cloth and let them air dry in a shaded spot for 20 minutes before hanging them. | Removing moisture right away prevents rust formation and protects the wooden handles from swelling and cracking. |
| You notice a tool handle is loose or wobbly. | Before further use, tighten the handle by wedging a wooden shim into the gap or replace the fastener that holds the head. | A secure handle is essential for safe use and prevents the head from flying off and causing injury or damage. |
| You have multiple long-handled tools that keep falling off the wall hooks. | Install two horizontal rails with U-shaped hooks that grip the tool handles at two points, leaving enough room for the handles not to slide. | Double support distributes the weight and prevents swinging, making the hooks secure and the tools easy to grab one-handed. |
Common Issues
- Rust forms on the metal blades of shovels and trowels.: Scrub the rust with a wire brush, wipe the metal with white vinegar or a rust remover, rinse and dry, then apply a light coat of machine oil or paste wax to create a protective barrier.
- Tools are constantly misplaced because they are stored in random piles or bins.: Create a designated home for each tool using labeled hooks, shelves, or clear bins. Group similar tools together and always put tools back in their spot after use, so you can find them immediately.
- The storage area has a damp, musty smell that transfers to the tools.: Improve ventilation by adding air vents or slatted shelves, place a moisture-absorbing desiccant like silica gel or a bucket of charcoal in the area, and keep tools off the floor to allow air circulation.
Advanced Tips
- Install a motion-sensor light in your tool storage area so you can always see clearly when you grab tools before dawn or after dusk.
- Use a shadow board: paint the outline of each tool on the pegboard so you instantly spot when something is missing and return it to the correct spot.
- Add a magnetic strip on the wall to hold metal hand tools like trowels and pruners, which keeps them visible and prevents them from sliding into a drawer.
Final Checklist
- Clean and dry each tool before storing to prevent rust and soil buildup.
- Store all tools off the floor on hooks, shelves, or racks to protect them and prevent accidents.
- Group tools by type and frequency of use, placing high-use items in easy reach.
- Set a monthly 10-minute check to tighten hardware, clean, and reapply protective oil to metal parts.
FAQ
What is the best way to store long-handled garden tools like shovels and rakes?
The best way is to hang them vertically on a wall using specialized hooks or a rack that holds the handles upright. You can also secure them in a freestanding tool tower with a handle slot on top. Always ensure they are off the floor so they do not become tripping hazards or get rusty from moisture. Position them so the heads are not resting on the ground.
How can I protect my wooden tool handles from cracking?
To protect wooden handles, keep them dry and away from excessive heat or sun. Before long-term storage, wipe handles with a light coat of linseed oil or a wood conditioner. Never leave them in a damp shed or in direct sunlight for extended periods. Also, avoid storing them leaning against a wall where they can bend and stress the wood over time.
Should I store my garden tools in the garage or in a shed?
Both can work, provided the space is dry and well-ventilated. A shed is often ideal because it is dedicated to outdoor tasks and keeps dirt out of the house, but a garage corner can work if you have space. You can also use a weatherproof outdoor cabinet if you have no shed or garage. The key is to ensure the area stays free of moisture and has good air circulation.